
Project Settings
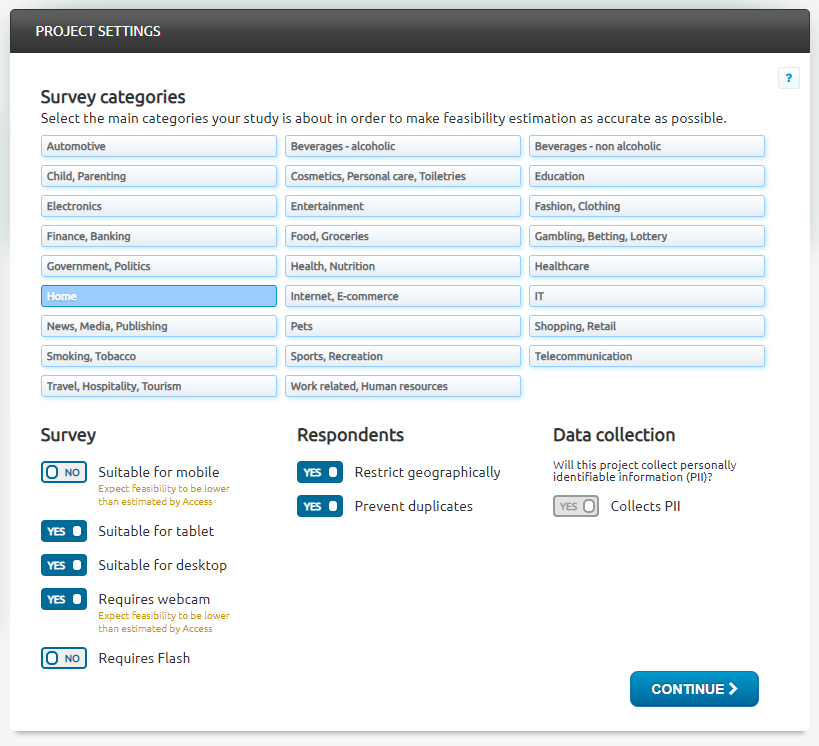
Survey categories are mandatory. Select the main category that your study involves. Panels have to allow all your selected categories in order to be included in the feasibility count. Example, a project about Electricity Usage would fall under category 'Home'. The more categories you select, the fewer panels you'll have access to!
Survey Settings
- ’Suitable for mobile’ - turn this off if your survey is not available on mobile, check the Knowledge Base for data on how much the qualified panellists are affected. Please note the system does not automatically perform this calculation, it is assumed your survey is available on all device types. Designating the study not available on mobile will block respondents trying to start the survey on a mobile device.
- ’Suitable for tablet’ - turn this off if your survey is not available on a tablet, check the Knowledge Base for data on how much the qualified panellists are affected. Please note the system does not automatically perform this calculation, it is assumed your survey is available on all device types. Designating the study not available on a tablet will block respondents trying to start the survey on a tablet device.
- 'Suitable for desktop'- turn this off if your survey is not available on computer, check the Knowledge Base for data on how much the qualified panellists are affected. Please note the system does not automatically perform this calculation, it is assumed your survey is available on all device types.
- 'Requires webcam' - if your study requires panellists to have a webcam, then the ones without one will be blocked from trying to start the survey. Please note the system does not automatically perform this calculation, it is assumed your survey does not require a webcam. Due to GDPR laws, when the webcam requirement is on, the Data collection is automatically selected to cover NDA.
- 'Requires Flash' - if yes, then panellists without Flash installed on their device will be blocked from trying to start the survey. Please note the system does not automatically perform this calculation, it is assumed your survey does not require Flash.
If you do not indicate device compatibility or webcam/Flash requirements at the project order stage, your project costs may increase during fieldwork.
Survey Security
- 'Restrict geographically' – Ensures respondents are located in the same country as your target group specifies. Default ON. Can be changed later. Turn this off if you want panellists currently located in another country to answer the study.
- 'Prevent duplicates' - Ensures the respondents take the study, not more than once. Default ON. Can be changed later. Mostly used by panel owners who have registered themselves in the panel and want to be able to test running projects with their own email addresses multiple times.
Data Collection:
- 'Collects PII' - If a study is collecting PII (Personal Identifiable Information) for survey recruitment. Default OFF. Turn ON when the survey contains questions that can be used to identify the identity of the respondent, such as name, email address or phone number. Use cases: Focus Group recruitment, online diary recruitment, downloading plugins and now eye tracking, webcam studies.
Demographic and Survey Specific Data:
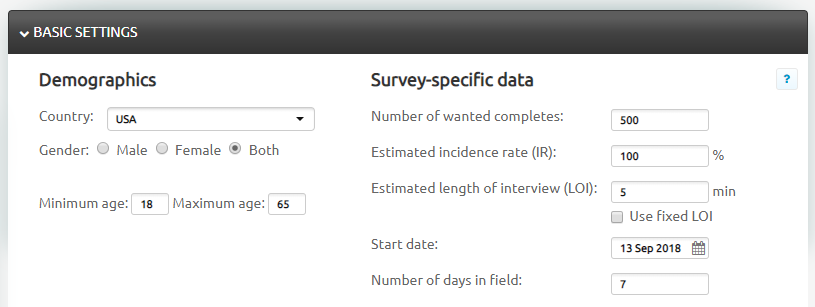
- Country – from this drop-down menu the fieldwork country is selected.
- Gender – ability to select/restrict the gender for a project.
- Minimum/Maximum age of a target group. The generic minimum age of the respondents that you can contact directly (without needing parental consent). Access PRO follows the minimum age country rules according to ESOMAR legislations.
- To contact respondents younger than the minimum age allowed in each market, you need to send your survey to the parents of the children. How to do this:
Create a target group for the parents that have children in the needed age range. Please contact the Cint Client Service team and they will adjust the survey invitation mail for you so that the parents know that the survey is aimed at their children.
- A number of wanted completes - The number of completes can be as low as 1, but it's recommended a minimum of 200 to achieve statistical reliability in your data.
- Incidence rate - The Incidence Rate is an estimate % of panellists that will qualify for the survey. It depends on the respondent profile you're looking for and is directly influenced by how strict the qualifying criteria of your study is. Please note feasibility assumes the project fits all selected project categories, will be available on mobile/tablet/desktop PCs, will not collect PII or sensitive information, does not require Flash or a webcam. If your project has any of these requirements, then you should consider lowering the Estimated IR. If you are looking for a very specific target group with a low incidence, it might happen that the project becomes not feasible. We advise you to use the profiling options to define more precisely your target group since this will in most cases help you to achieve better results. Incidence Rate influences the price of your target group.
- Estimated Length of Interview -The time needed to complete the survey is called Length Of Interview (LOI). How are respondents incentivized? LOI is communicated to the respondents in the survey invitation e-mail and the respondents' reward is based on it, depending on their panel's settings.
- A number of days in a field - Days in a field will affect the feasibility of your target group. It might be hard to collect the needed number of completes within 1 day. Feasibility accounts for the sample being used in projects and kept in quarantine for 7 days. More days in the field increases feasibility as the system accounts for panellists which will be available for the project at a later stage once released from quarantine.
- IR and LOI country limits: Based on international standards and on experience, Cint has implemented rules for minimum and maximum allowed the length of an interview (LOI) and incidence rate (IR). These are called country rules. Projects can be created only if they meet the minimum IR and the maximum LOI for each country.
- Fixed LOI: the ability to set up the LOI on a target group level. This feature only applies for own panels (they must be selected in Audience section) and keeps the costs down by not letting the actual LOI effect the incentive. The fixed LOI can also be adjusted when infield on a target group level
Regions
Allows users to make regional selections at sub-country level. From main national regions (NUTS 1), provinces (NUTS 3), Nielsen regions, States, Federal/Government regions local regions, counties, DMAs, municipalities down to postcode* level. Please note that region granularity differs per market. *Postcodes need to be uploaded in the correct formatting (a CSV. file in which they’re sorted in ascending order with no duplicate values) in Access Pro. For example, in the UK Access Pro accepts only the first part of the postcode for example “NW1” and will not accept full UK postcodes as “NW1 2SQ”. Please note that in some markets where there’s limited regional targeting available, it can be found under the “Profiling” tab of Access Pro.
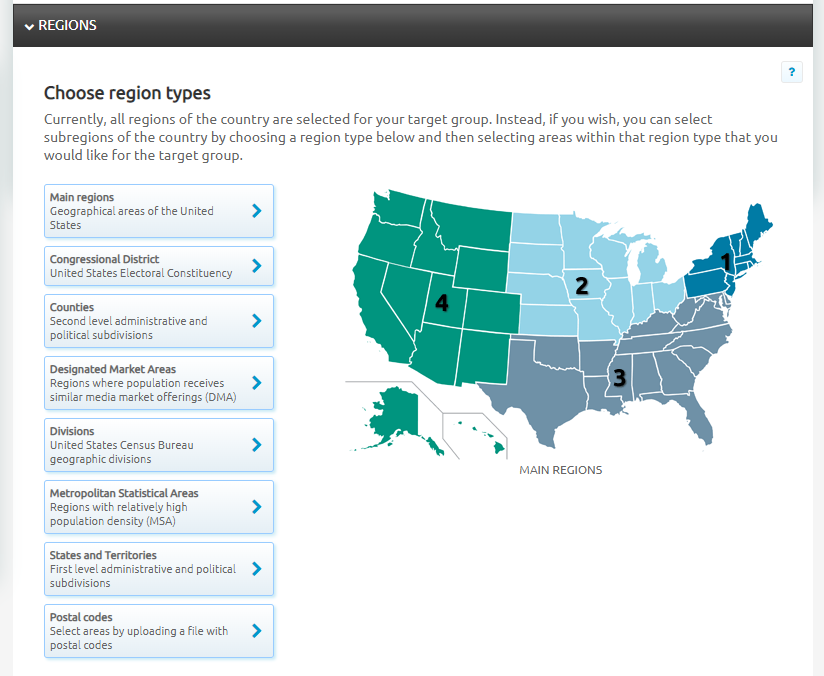
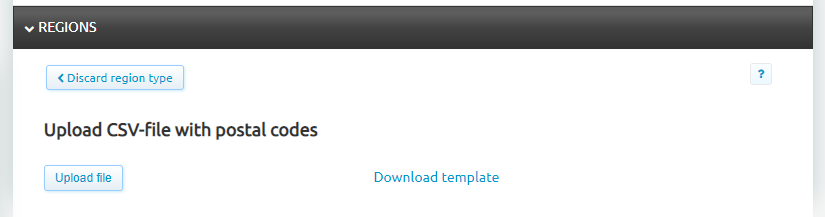
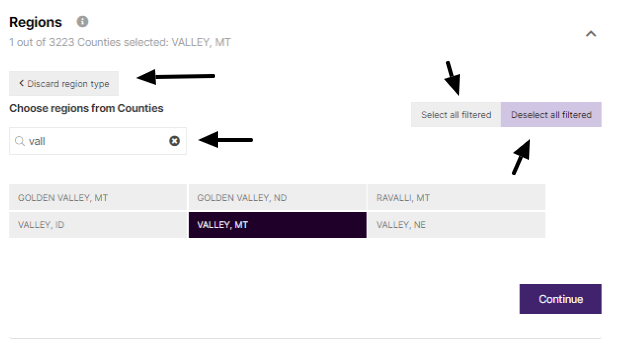
If you're not interested in using Postalcodes, you can use our region feature. If you're a bit unfamiliar, here are some pointers:
You have the option to search the region name specifically (via the search box), and even if you're not absolutely sure which region it is, as long as you begin to search the region, your results will populate the possible regions you may be after.

From here, you have two options, you can click the region type or the specific region you're seeking. After your input, you will be sent to the region type view that will allow you to see everything that matches your search.
Of course, you also have the ability to use 'Select all filtered' or 'Deselect all filtered' as well if needed.
Audience
The set of panels to be used for the project and the individual target groups can be customized in that tab.
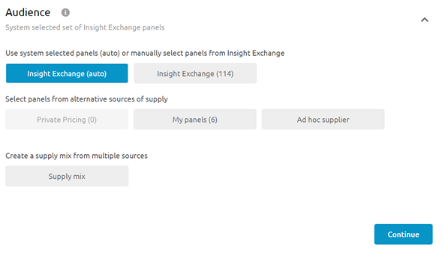
- Insight Exchange panels – shows all panels from the Cint open exchange in the selected market.
- My Panels – shows all client owned panel assets in the selected market.
- Private Pricing – (Private marketplace) showing all panels integrated within Cint’s platform which a separate pricing agreement with the client, in that selected market.
- Specific panellists - allows the user to upload specific panellists Ids or respondent GUIDs which to be used in the target group. The example in a re-contact project here the user would copy past all IDs that need to be re-contacted in the follow-up survey.
- Ad-Hoc supply – allows to route third-party supply sources which are not part of the Cint exchange through the platform. The ad-hoc supplier needs to be set up as a source once, by selecting the survey language and then the button “Create a new supplier”. Once created the ad-hoc supplier would remain in the Ad-hoc supply tab for the selected market. If a different market is selected and the same supplier will be used, the process would need to be repeated.
- Mix Supply - the option to create quotas on suppliers by creating groups and selecting the panels one wants to use. Running trackers can be used for the same supply mix and maintain data consistency.
- The projects overall progress can be monitored efficiently even when mixed with different supply sources. Quotas on suppliers will enable clients to become more cost-efficient, by optimizing the usage of their own panels first and later sampling from the external marketplace.
Action buttons:
- Select all / Deselect all – automatically selects or deselects all available panels.
- Reset to default – automatically removes a panel(s) that have been selected and returns the user in the main Audience selection tab.
Please note that if a user goes into any Audience sub-tab, but fails to select a supply source and moves to another tab, like profiling, the system will be unable to show feasibility. Regardless of any profiling selected Access Pro needs to have a supply source defined in order to provide feasibility calculation.
Profiling
Profiling helps target in a more specific and effective way, by choosing any number of profiling attributes that match the survey target criteria
Supply Sources and effects on profiling. When individual panels are selected Access Pro allows, panel specific profiling to be enabled. This allows the user to access any profiling questions which are specific just for that panel source.
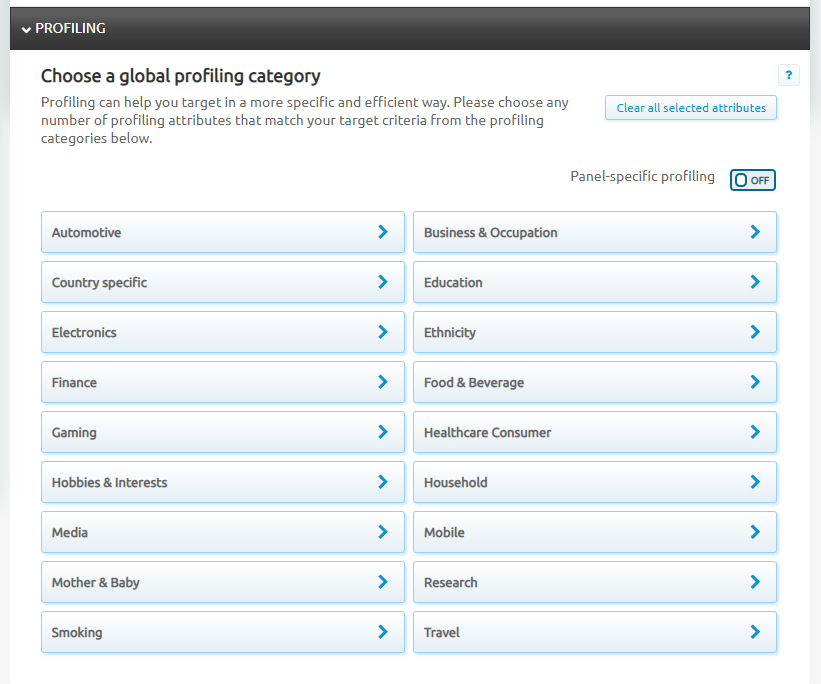
Profiling Categories
- Automotive – contains all automotive and motorbike questions, including insurance, car brands etc.
- Business and Occupation – contains all profiling questions around employment, job roles, industries, company sizes etc.
- Country Specific – contains specific profiling variables which apply only for a selected market. Example of such variable would be “social class” in the UK, which does not have an alternative in Italy.
- Education – contains all profiling questions around level of education, subject and graduation year.
- Electronics – contains profiling questions about electronic products such as digital cameras, printers, Smart TVs etc.
- Ethnicity – contains profiling questions about respondent’s ethnicity
- Finance – contains all profiling question about personal, household income, savings, banks and financial products.
- Food & Beverage – contains all profiling question about grocery shopping stores, restaurants (fast-food) and drinks that respondents consume.
- Gaming – contains all profiling questions about gaming platforms and devices, types of games, hours spend playing etc.
- Healthcare Consumer – contains all healthcare profiling question about illnesses/conditions.
- Healthcare Professional - contains all healthcare practitioner profiling questions about doctors/nurses.
- Hobbies and Interest – contains all profiling questions around sports and other activates in which respondents participate as a hobby or interest – gardening, cycling, gambling etc.
- Household – contains all profiling questions affecting the household – utility companies, household size, marital status, the presence of children and their age, pets and animals etc.
- Media - contains all profiling question around types of TV channels, TV and entertainment packages, Radio, publications and social media use.
- Mobile – contains all profiling question around mobile phone plans, devices and brands etc.
- Mother and Baby – contains all profiling questions around babies and pregnancy etc.
- Region – contains limited regional profiling question around provinces, cities, size of in markets where there is very limited regional targeting.
- Research – contains profiling information on different types of research, webcams, cookie, online tracking.
- Smoking – contains all profiling information on tobacco products use and smoking.
- Travel – contains all profiling information around travel, a number of flights, what type of flights and airlines, types of holidays/vacations, regions/countries visited etc.
Importance of profiling selections
It’s important to note that any profiling that is not selected when the project is setup will directly affect the incidence rate of the project. It is not possible to add profiling selections to a target group after it has been created/commissioned.
Profiling Logic
- Profiling logic among two or more question/categories is “AND”. Example a respondent owns a “dog” AND lives in “owned flat”.
- Profiling logic within multiple answers within a single question is “OR”. Example a respondent has either “1, or 2, or 3, or 4” children in the household.
Profiling depth and Cross-profiling.
When multiple profiling questions are selected feasibility will decrease. The reason is that by selecting multiple profiling questions the sample pool is being narrowed to include only the respondents who fit the specified criteria. Another factor at play is the profiling depth of each of the selected questions also narrows down the available sample pool. Profiling depth, shown in blue above the question answer options, shows what percentage of all panellists have given any answer to that question. Therefore, if combining multiple profiling questions with low profiling depth feasibility decreases significantly, as anyone who hasn’t given an answer to all 3 questions is excluded. If someone has answered only one of the needed 3 profiling questions they are considered into the sampling pool, although they might qualify if they had given an answer to the other 2 questions, even if all possibilities qualify. Example if a survey needs people who earn £10,000 a year or more, live in rented or owner accommodation and either have or don’t have a pet. The latter 2 profiling questions have been selected for quota monitoring purposes. Then if a respondent who earns £10,000 pounds, but hasn’t specified in whether she/he rents or owns the place they live or if they have a pet or no, they would not be considered in the sample pool. Although the latter 2 profiling questions are for quota purposes and not screening, someone who hasn’t answered them would not qualify.
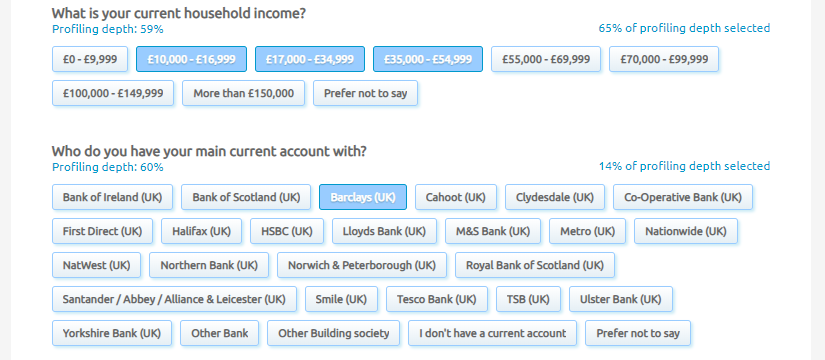
- Profiling depth of selection – once an answer option within a question is selected above the answer options in the right corner Access Pro will display the profiling depth of the selection. This percentage shows what % of all people who have given answered that question, have given that specific answer. Please note that this can be considered as a proxy estimation of gen-pop IR for that selection. Keep in mind that this is not 100% accurate and is something to be used as a very rough ballpark, actual gen-pop IRs can differ significantly.
- Quotas on profiling - If there are specific quotas in place but no profiling is selected it would not be possible to control sampling on these variables, turning them into non-targetable quotas and these would have to fall out. Example if a project is looking after a specific split of people who rent or own a home, without selecting profiling for accommodation situation, it would not be possible to control how many respondents who own and how many who rent would be invited into the survey. Therefore, if the project has quotas on accommodation type, in order to allow sampling for individual response options, later on, the user would need to select all answer options from the question. This will allow the user who is sampling, to open/close specific quotas and manage invites send per specific response option/quota.
Action buttons
- Clear selected attributes – this button located in the top right corner of each profiling sub-tab as well as the main profiling tab. If selected within an individual sub-tab this button automatically de-selects all profiling only within this tab. If selected in the main profiling tab it will automatically de-select all profiling applied to the project from all sub-tabs.
- Go Back – this button appears in the top left corner of each sub-tab and when selected returns the user into the main profiling tab.

Quotas
This tab allows the user to set-all quotas that are needed for the project including both demographic and profiling quotas (assuming profiling has been previously selected, in the previous tab). Please note that if profiling or demographic quotas are not set up, once the project is created it would not be possible to sample for specific age/gender/region or profiling groups specifically. If specific quotas are needed the defining bands need to be created at the setup stage, numbers within the band can be adjusted if needed once the project is created.
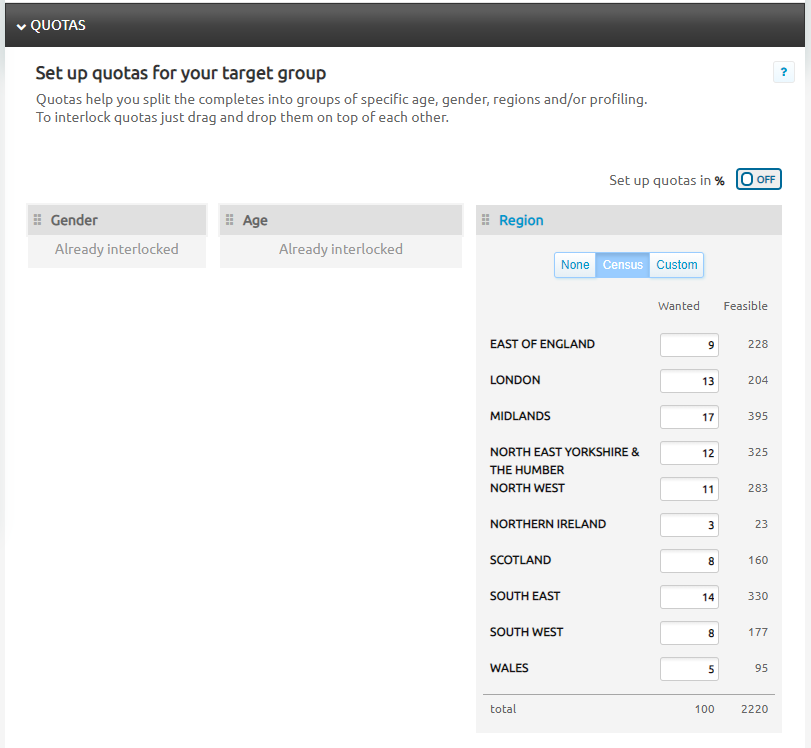
- Demographic quotas - AccessPro allows users to set-up individual demographic quotas on age, gender and region. These quotas can match the UK census (nat-rep) for the entire UK population or alternatively users can set custom quotas age bands and custom quota distributions. Please note that when custom quotas are entered the total number of wanted completes needs to add up to the total number of wanted completes that have been entered on the basic settings tab for that target group/market.
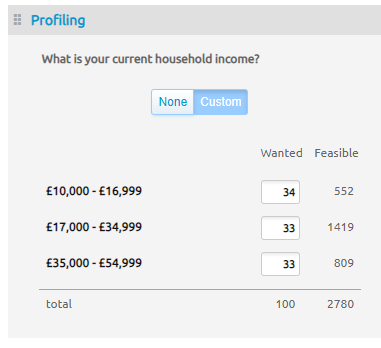
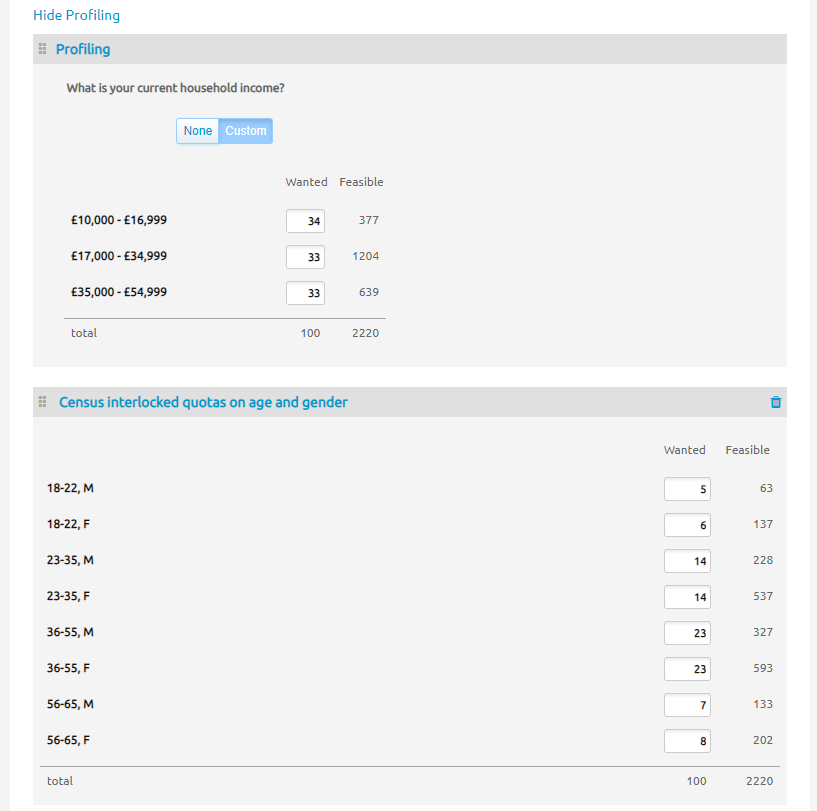
- Profiling custom quotas – Access Pro allows to set up quotas on any profiling that has been selected. The quotas on profiling are always custom and automatically our system splits wanted completes equally among all answer options.
- Interlocking quotas – Access Pro allows quota to be interlocked, simply drag and drop one quota on top of another. Once this is done Access Pro will automatically interlock the quotas and reassess feasibility for the newly combined quotas. Demographic quotas can be interlocked amongst each-other but can also be interlocked with custom profiling quotas. Please note that it is not possible to interlock profiling questions in the quota tab. It is possible to have non-interlocked quotas on one or more profiling questions.
- Quota setup – In the top right corner of the Quota tab is a toggle called: Set up quotas in % with an on/off button. This toggle switches between a number of wanted completes and % of wanted completes.
- Wanted/Feasible – Once a target group is defined “Wanted” above the quota buckets represents how many completes are needed/ wanted in that group. Feasible shows how many completes Access Pro estimates it would be able to deliver in that group. Please note that when quotas are being set up in %, sometimes the feasible field can show percentage in excess of 100%. For example, a project has a gender quota of males/females 50%/50% split. The wanted field shows as feasible for males 300% and 500% for females. This simply means that the system can deliver 3 times (300%) and 5 times (500%) more completes than needed in those quota groups. This is how excess feasibility is shown in Access Pro when quotas are being set up in percentages.
Exclusions
The tab allows the user to set project exclusions by selecting one or more projects and specifying the status or statuses from these projects which have to be excluded.
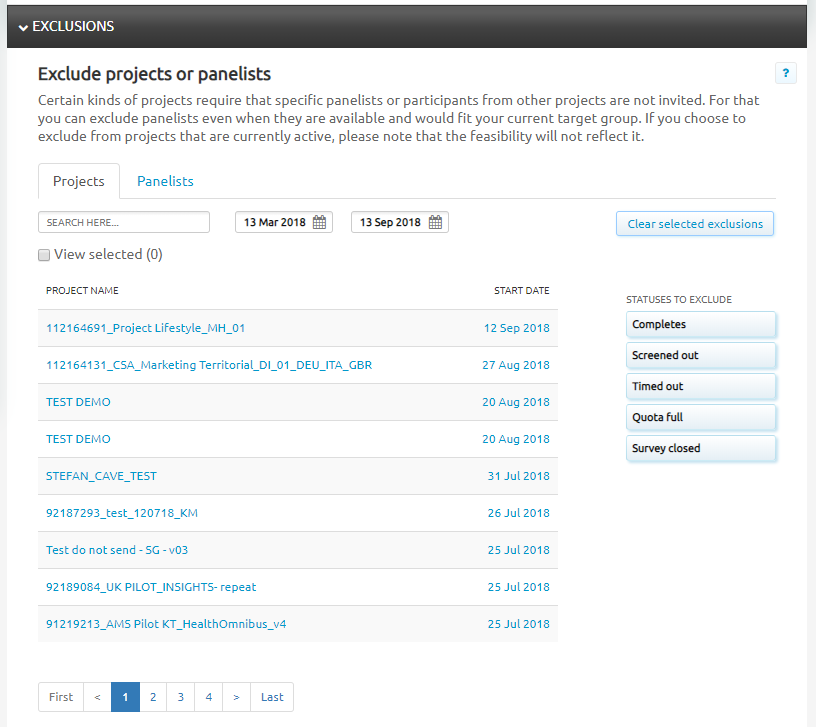
- Tabs - There are 2 tabs Projects and Panellists to choose the type of exclusion.
- Projects - shows all projects available for exclusion inclusive of project name and start date. The tab contains a search box where projects can be searched by name or date. At the bottom of the tab, there is a page number indicator and arrows for navigation, if there are more projects that can be displayed in the tab
- Specific panellists - a feature to pinpoint which specific panellists are not allowed into a TG. All this, simply by uploading Respondent GUIDs or Panelist IDs.
- Selected projects 'tick field' - shows all projects that have been selected for exclusion allowing clear separation among all potential projects for exclusion. On this tab needs to be specified what statuses need to be excluded from the project.
- Statuses for exclusion - on each tab on the right-hand side across the project name and start date can be found all statuses that can be excluded. Please note that one or multiple statuses can be selected, however, it is not possible to exclude different statuses from different projects or at different stages of the project. For example, if completes and quota full statuses are selected from 3 past projects, during the fieldwork it would not be possible to relax the exclusion and focus only on excluding previous completes, or to exclude only completes from projects 1 & 2 and from survey 3 to exclude only those who ended up as a quota full in that project.
Action button
in the top right corner of the Exclude tab, there is an action button “Clear selected statuses” which once pressed clears any exclusion selections made so far.
Feasibility and Pricing
- Project settings wheel – allows the user to go back to the project settings page and make changes to the project, survey or security settings of the project setup.
- Project name - On the right side of the project settings wheel the user can find the name of the project, the default name is “New Project”. This can be changed when saving the project as a draft and giving it a specific name, or when creating the order and giving it a project name.
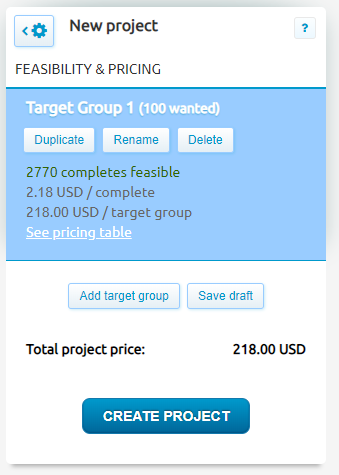
Target Group
- Name - The default name of is “Target Group 1” and next to the name in brackets Access Pro shows the number of wanted completes for that target group.
Action Buttons
under the name of each target group in Access Pro, there are 3 action buttons.
- Duplicate – when selected Access Pro will create an identical copy of the target group as an additional target group. If no name is given to the initial target group, the new one will automatically be named “Target Group 2” by the system.
- Rename – this button allows the user to name the target group as they choose to, giving specific names to the target group(s) or countries in case each target group represents a different country. This can only be edited during the setup.
- Delete – this button deletes the selected target group.
- Add Target group – allows the user to add a blank target group to the setup which will have to be filled in from scratch.
- Save draft – this button allows the user to save all the entire setup created up to this point. Once saved the draft can be accessed under the draft tab from the main Access Pro dashboard. The user decides what name to give to the draft following their own internal rules and guidelines if there are such, to allow other users to find more easily the needed project draft.
Feasible completes, CPI and Pricing table
under the 3 action buttons, Access Pro shows how many completes are feasible while accounting for selections made in all other tabs such as basic settings, regions, supply, profiling, quotas and exclusions.
Under the feasibility is shown the cost per interview in the respective currency.
- See pricing table – allows the user to see the pricing table that applies to the selected country and specified volumes. It can be used to illustrate how cost could change if the user were to input different IR or LOI metrics. The pricing table contains information about the current parameters of the project and information about what change of IR/LOI would entail.
- Target group / Total project price – shows how much would be the costs for both the specific target group and the overall project. Please note that the total price is a product of feasible completes times the CPI. The total project price combines the price of all target groups together.
- Create Project – once the project setup is created, the audience has been defined profiling selections, quotas and exclusions (if applicable) have been specified, the user needs to select the “Create Project” button in order to create the project and convert the project into a sampling setup.
Comments
0 comments
Please sign in to leave a comment.