
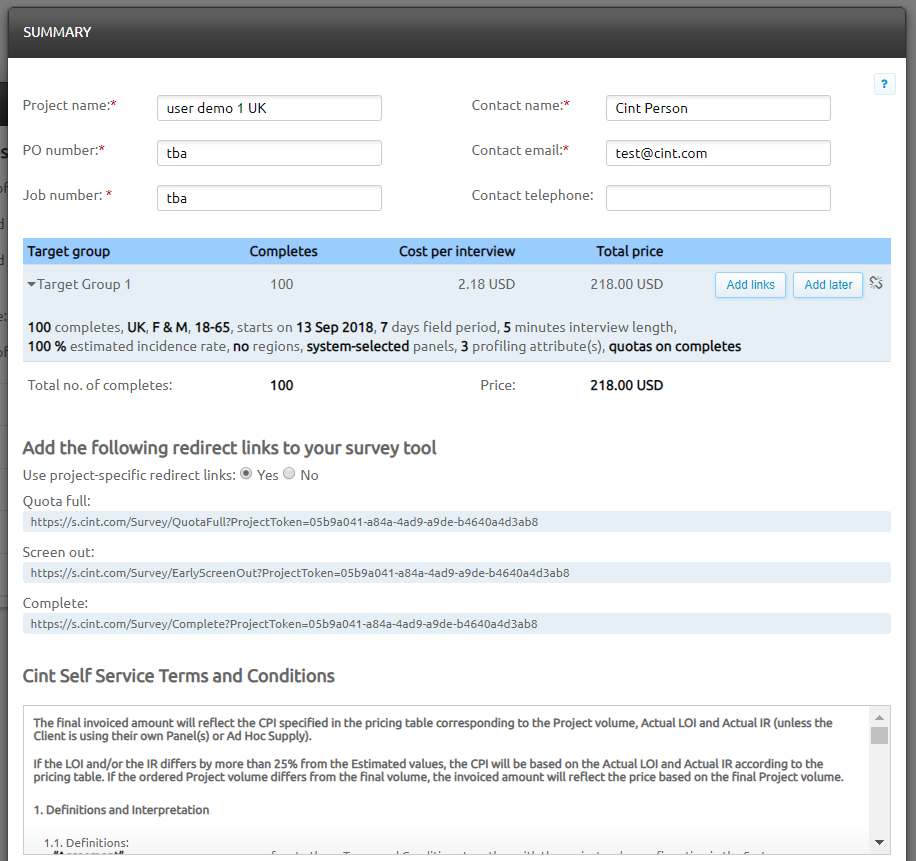
Summary page contains specific survey information like project details, redirects and Terms and Conditions. This page requires input on further project details. All information listed below much be added and confirmed by clicking ‘run project’ within one hour to avoid session timeout.
- Project name – this should include full name; we suggest adding country name or abbreviation; if it’s part of a multi-wave project, always add wave number/name, so it can be easily found in project list for exclusion or any other task
- PO – purchase order must be added for all projects if applicable (it can be edited during the project)
- Job Number – internal Job number, which will be shown in the invoice
- Contact name – Full name of a person creating the order
- Contact email – email address, by which Cint team can get in touch once an order is created to send approval confirmation and provide support on a project level
- Contact telephone number – contact number for further communication

Target group
Target group’s specifications can be viewed by clicking on the arrow next to its name, before placing the order. Please note, target group name should be edited in the setup stage.
Survey links need to be added to each of your target groups by clicking the Add links button. When the survey links are added, the green mark will be shown, and you will be able to replace the survey links if needed by clicking the button again. If the survey links are not ready during the setup, click to "Add later" so you can proceed with creating an order.
Adding Survey Links
Access and Access Pro can work with two types of survey links. It depends on the survey tool and approach used for a project. Link template should be used when a generic link is available. In order for Access and Access Pro to track respondents, a unique respondent identifier is automatically generated and appended to every live link. The system knows where to place the respondent identifier in the link by the tag [ID] that is inserted in the link. This ID is commonly referred to as the GUID or code, which contains 36 digits, numbers and letters. (i.e. 00789c4f-1808-41e3-be79-ef4f1682ab48).
The GUID or code identifies what survey the respondent participated in and what status they received when they return to the system. It then allows the system to automatically credit incentives to respondents with status “complete” based on the incentive models used for each panel. Optional tags can be added if needed:
Gender – [S] – the outcome would be: 1- male, 2 - female
Year of Birth – [YOB] – ear of birth i.e. 1988 will be shown in the data file
Post Code – [PC] – full post code (except UK, where only first part of postal code is shared)
Panellist ID – [P] – unique identifier in Cint system per panellist
member ID – [M] - unique identifier within the panel
An example, how a link would look like with mandatory and optional tags:
http://www.yoursurveytool.com/XXX/XXXXXXX?c=[ID] ]&gender=[S]&pc=[PC]
Please note, [P] and [PC] tags are not available by default. To make those available on your account, please contact Cint.
Formatting
Url not longer than 1000 characters
Url starts with http:// or starts with https://
Url contains required [ID] tag
First variable should always be appended with a ‘?’, while all consecutive tags should have an ‘&’ before the value
Url is correctly formatted, as per Microsoft's built-in method, based on RFC 2396 and RFC 2732 standards
As long as the project is active it is possible to change the link template and next invitations will be sent using the new template.
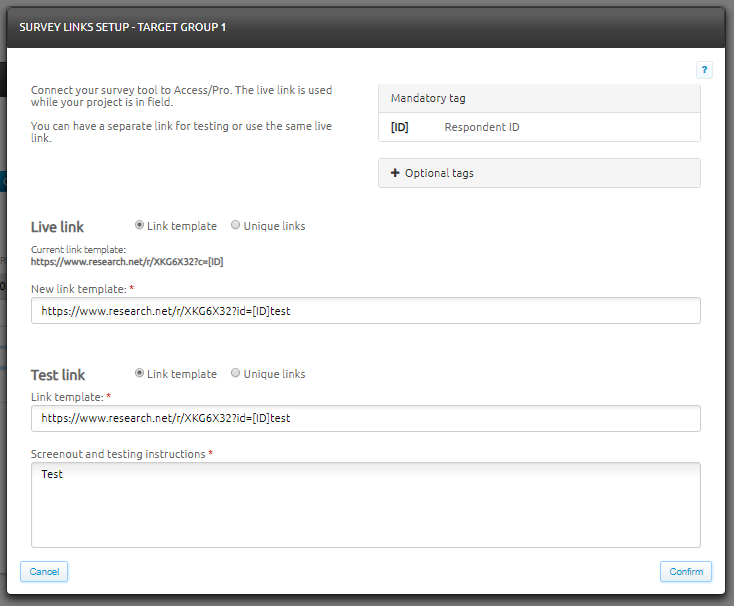
How to add link template
Copy the survey link template from your survey tool and paste it in Cint Access PRO in the “Enter Link Template” box.
Survey link example: http://yoursurveytool.com/surveys/xxx
Add the [ID] tag after the link and a variable name that your survey tool can store. The variable name is determined by your survey tool. In case of doubt, please check their documentation.
Examples:
http://yoursurveytool.com/surveys/xxx?c=[ID]
http://yoursurveytool.com/surveys/xxx?variable=value&respondent=[ID]
Each time a respondent is invited to a study, Access/Access Pro will use the link template to generate a unique survey link by assigning a unique GUID. Example: http://yoursurveytool.com/surveys/xxx?respondent=00789c4f-1808-41e3-be79-ef4f1682ab48
Live Links/test links
Once live links are uploaded, either a couple of unique test links need to be added in the test links field or a dynamic test link (it can be the same as live link or be a completely different structure link)
Screening information
When a new order is created in Access or Access PRO, in order for Cint to test the survey fully, it is very helpful to have either screening questions or criteria to complete the survey more efficiently.
Unique Links
Click on the Unique Links option.
You will now be able to download the template file which shows you the format in which the links need to be uploaded to the system. You have to upload at least the number of unique links suggested by Access, a couple of links for testing and any important information about your project.
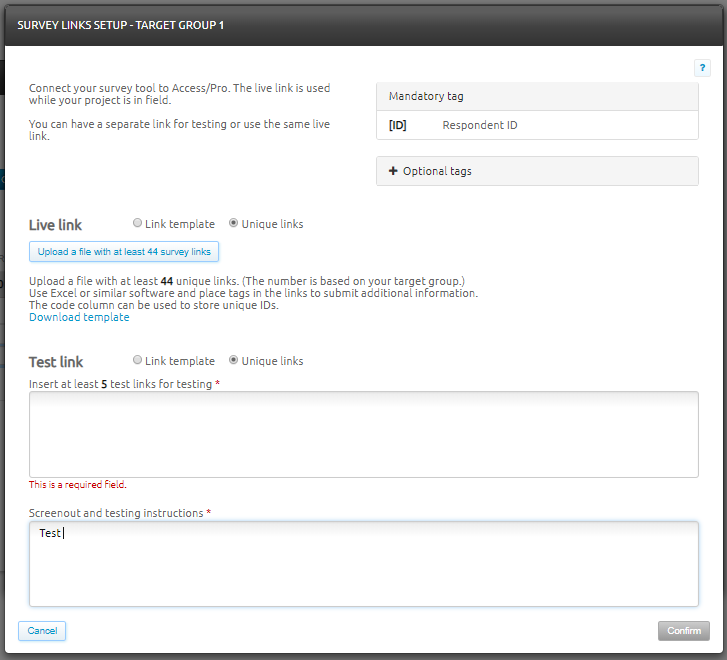
It is important to not remove the first 3 rows of this template file. Copy the required number of survey links from your survey tool and paste them in the file, first link in row 4 column A (one link per row). If your file does not look as above, then please refer to here for help with any template file issues.
Once the links have been copied into the file, save the file to your computer and make sure that it is saved as a .csv format. Upload the file to Access by clicking on “Upload a file with at least XXX links”
A couple of unique test survey links should be added alongside with other information that is important for Access to know. Make sure not to include any test links in the live links file.
As long as the project is still active you have a chance to upload more survey links and next invitations will be sent using the new one, but please make sure to inform Cint of your new upload. The system will notify you when the target group is running low on uploaded survey links, and how many it recommends that you upload.
Please note unique link file can only be updated, but not replaced - if this needs to be done, please get in touch with Cint to remove the current unique link file.
Redirects
A redirect is a landing webpage where respondents are taken after answering an online questionnaire. They help to keep track and defining the status of the respondent as well as the incentive they will be entitled to get.
Redirect links from Access have to be copied and inserted into a survey tool.
Redirect types
Complete - used for the respondents who have finished the whole survey
Screen out - used when a panellist does not fit into your target group
Quota full - used when a panellist is trying to answer a survey but the project has reached its wanted quota for this type of respondent.
The re-direct links are provided before the order of the project is submitted in the 'Project Summary' page and also can be accessed later in the Project Overview page at any time.
Cint highly recommends using project-specific redirect links since these will be generated with a unique identifier, called Project Token. This prevents respondents from the possibility of going directly to the Survey Complete page and being registered as a complete, thus ensuring optimum security and quality.
The survey redirect pages are panel sensitive, they are automatically displayed in the appropriate language for the respective panel.
Terms & Conditions (Non-Disclosure Agreement)
Cint Access and Access PRO Terms & Conditions can be found here at any time here.
An additional Non-Disclosure Agreement Terms & Conditions need to be agreed in the summary page if Data Collection is selected in project settings
Run project
When all details are checked and above steps completed, ‘run project’ button can be clicked to be redirected to project overview.
Comments
0 comments
Please sign in to leave a comment.