
The definition of the panelists you want to interview is called target group. A project can have a minimum of 1 target group and maximum 50.
It includes information such as the number of completed interviews wanted, the country from where people interviewed need to come from, the incidence rate, the length of the survey, the start and the end date of the fieldwork, the demographic criteria and the profile of the respondents that you wish to interview (smokers, car owners, mother of babies etc…).
A target group can have quotas, to distribute your interviews across different demographics.
From your survey tool, you'll add survey links to the target group, the system will use those to invite the selected panelists.
If the project includes multiple countries, each country will need to have a separate target group.
The system will use your target groups definition to bring the right people into the survey, therefore it's very important to define correctly the target group.
To get started, you’ll hit ‘New Project’ and you’re already editing your initial Target Group (TG). Your initial selections will be the category or type of study you’re setting up. It’s important to select the proper category to ensure the system can accurately estimate the fill we have available.

For this demo, we’ve picked ‘Home’. We’ve also selected a couple other options as seen below:

Since the study is device agnostic (can be completed on all devices) we’ve kept all devices selected. If this wasn’t suitable for mobile (as an example) we could toggle that off. We don’t require webcam or flash for this study, so those are off. We only want USA participants, so we’ve set this to restrict geography (default setting), and of course we don’t want duplicates so we’ve left that as well. No need for PII, and we’ve left that untoggled.
Now we continue to basic demographics of our target individuals. Here, we’ve added:
Country: USA
Gender: Both
Age: 18-35
Wanted completes: 500
IR: 50%
LOI: 5 minutes
Start date: Today
Fielding days: 5

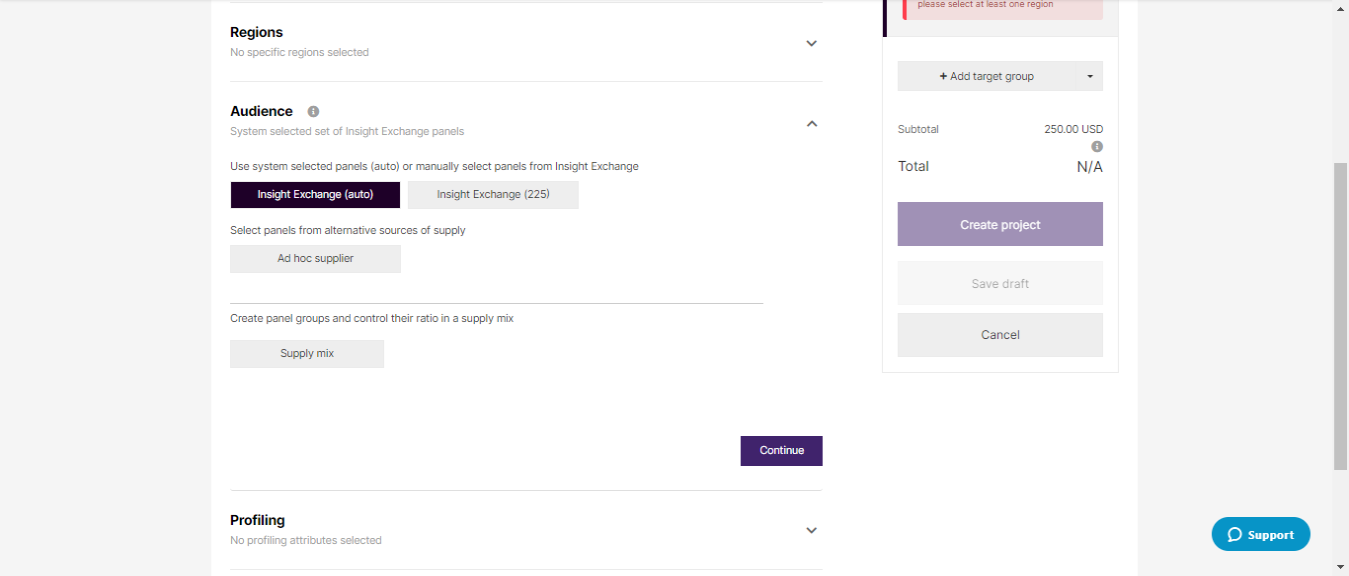
After ‘continue’ing, we’ve selected Main regions minus the ‘south’ option (you can see that ‘south’ is made up of the lower right half of the map labeled ‘3’, which brought us to Audience.

Audience allows you a few different options which we will go over more in depth on the specific guide page. For this, we selected Insight exchange auto.
Now we’ve made our way to Profiling. This is where you can further target the individuals. We’ve selected the ‘Household’ option which opened us up to all profilers relating to household information. Here, we’ve selected 0-1 children, owned home, and marital status: married. That means we’re looking for anyone that has either no children, or one child. They own their home, and they are married.

We then scrolled to the end of those questions and clicked continue, which brought us to quotas! Quotas help you grab exactly what you need. Maybe you want 18-35 year olds, but you don’t need 22-26 year olds, we can adjust from this portion:

If you see the numbers next to the ages, you’ll see we want 250 in 18-21 and 27-35 with 0 in 22-26 year olds. Next to that number, we see red and green numbers. The red number tells us that we can expect only 26 potential completes in the 18-21 range that have 0-1 children, own a home, and are married (which is reasonable). The green numbers tell us that we’re feasible for all our wanted completes there. We’ve set our expectations on that 18-21 group, and we’re moving forward!

Exclusions are specifics where you can block certain individuals (panelists) or if this is a second project, you can restrict anyone that entered the last project from entering this project (Projects). If you don’t want to exclude, you can move on to either Create your project, or save it as a draft!
This portion will show you what to expect:

You can also click the ‘Target Group 1’ here and rename it to something you’ll remember. You can see how many completes the study is feasible for, the CPI, CPTG, any issues that may affect sampling (that yellow box is indicating that we’re low on sample for the 18-21 quota mentioned above), as well as the total this will come out to be if the job finishes as noted.
You also have the option to click ‘+Add target group’ if you have a different country you want to run this in, or perhaps a different setup (maybe non parents, maybe singles, etc).
Eventually, you will click Create Project, and add in your final contact information to get the study launched (that portion is noted in a similar article)!
Comments
0 comments
Please sign in to leave a comment.